Hellloooo!
I'm so excited to share this new tutorial! It's a super easy, super adorable bubble skirt. It's made using any knit fabric, and there are NO HEMS - just seams! This tutorial was originally posted at
A Couple of Craft Addicts as part of their Serger Series week. Wicked fun. :)
I was so excited to be asked to be a part of Serger Week - I LOVE my serger to bits, and I use it on just about every sewing project! If you sew for children (or at all, really) - a serger will make you happy. Trust.
So here's what I put together for the beginning serger user:
A super fast and easy bubble skirt, made with just 3 rectangles! Huzzah!
I hope through this tutorial you can get a good understanding of what a serger does, and how you can use it to make quick work of your sewing projects. But don't go away if you don't own a serger!!! You can
absolutely sew this skirt on a sewing machine.
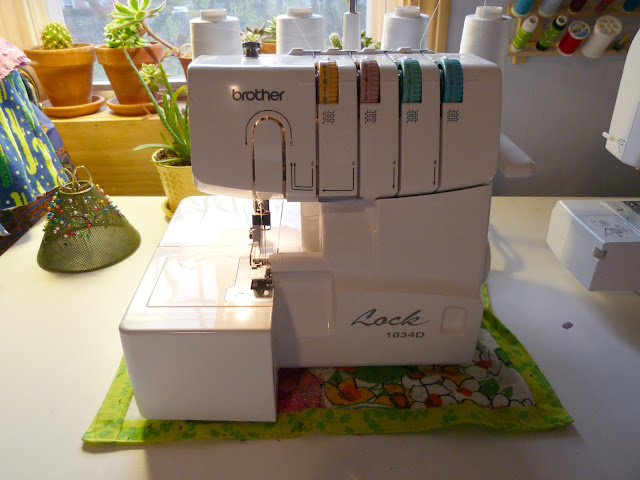
I own the Brother1034D. I think a pretty large number of home sewist who
have a serger - have this one. For good reason! It's relatively affordable (less than $200 on
Amazon right now - that's what a lot of
sewing machines cost, people!), and the reviews are undeniable.
Here she is, sitting on her
serger seat:
Here is a bigger peak into my sewing room, if you're into that kinda thing, like I am. ;)
I've had this serger for about 2 years now, and I have absolutely no complaints. None! Once you know what you're doing - which admittedly takes a little time - it's a breeze to use. At this point I'm
still learning its' capabilities, but I look forward to using it any chance I get. Maaad serger love. :)
Ok, so here is the business end of the serger!
The numbers on the dials that are in black - like the
5 on No. 1, are the common, typically used settings that work for most applications. The 'R's are the settings needed to achieve a rolled hem.
Here is an example of a top I made with a rolled hem. Delicious. :) The rolled hem setting can also be used on knits to create a lettuce edge hem,
like so! So super awesome.
When serging knits, it's the differential feed (4.) that you want to check out. When this dial is set to
1.0, your two sets of feed dogs are moving at a 1 to 1 ratio, or, in unison. When the dial is set lower than 1.0, your rear feed dogs are moving faster than the front ones, therefore pulling and stretching your fabric as it goes through the serger. This is not a good thing if you want a nice flat seam on a knit. You will have a hot wavy mess on your hands. If you are serging fine woven fabrics that tend to pucker (think chiffon, silk), this lower-than-1.0 setting is a good thing, and you will have a flat, non-puckered seam. Raising your differential feed above 1.0 causes the rear feed dogs to move slower than the front ones. This takes away any stretching issues with knits. You'll notice that there are a few different stops on the road from 1.0 to 2.0. This is because there are so SO many different types of knits - some that need the rear dogs to move really slowly, and some where just a little slow-down does the trick. Take a few scrap pieces of your fabric and play with the differential feed settings between 1.0 and 2.0, to find what's best for your particular fabric.
Stitch length and width are more a preference thing - I generally leave them on the bold numbers. And the knife - I keep it up at all times because it's rad and impresses my husband.
Ok, so let's serge a skirt, shall we?!
You will need:
This will depend on what size you make, but not likely more than 1 yard of knit fabric.
A serger, loaded up with matching thread
Your sewing machine - for a basting stitch to make gathers
A few notes:
I want to make sure it's clear that this project does not, by any means, NEED to be sewn on a serger. Anywhere I am serging seams, you can absolutely use a zigzag stitch on your sewing machine. The waistband seam is the one that will get the most abuse, so a nice high width/short length zigzag would be best there, for optimal stretch. Cool? Ok.
About fabric - you will have all sorts of different results (all good!) depending on the type of knit you choose. Mine (c/o Kitschy Coo, it's amazing! Go git some!) is pretty stable, not slinky at all, resulting in a good poof effect. If you choose a drapey, slinky knit, your skirt will have a more swooshy, swingy effect. Both awesome. Proceed without caution. :D
Below are the pieces I cut out for Emmy's skirt:
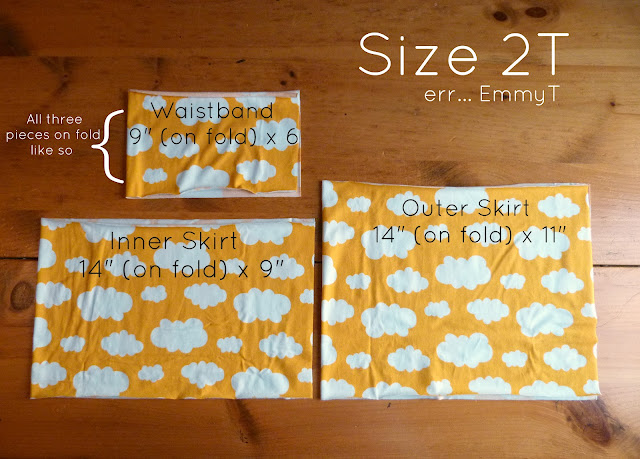
WAISTBAND: Your waistband height will ultimately be half of what you cut - mine was 6" tall to start, and is 3" on the finished skirt. Factor this into your total skirt length. Also, you want the waistband to fit snugly, so I subtracted about 1.5" off of Emmy's waist measurement for my waistband width. 19.5" minus 1.5" = 18" waistband, cut on the fold at 9". * If your knit is ultra stretchy, subtract more like 2"+ from the child's waist measurement, so the waistband is nice and snug.*
OUTER SKIRT: Determine the length you want your skirt to be, then subtract the finished waistband height (3" in my case). I wanted my skirt to hit just above the knee, so using the chart below, I took 12", minus 3" for the waistband to get 9". The Inner Skirt will lift your hemline by about 1.5" inches, bringing me to 10.5", so I rounded up to 11" for my outer skirt height (for growth and longer wear). Geeeez I hope this makes sense. Leave a comment on this post if I'm confusing you, and we'll discuss.
INNER SKIRT: Same as Outer Skirt, minus 2" in height.
To get the width of both Inner and Outer Skirt - multiply your waistband by 1.5. My waistband was 18", times 1.5 = 27", but I cut out 28" for what reason, I don't know.

Above is a chart I've put together with the average body measurements of wee toddlers.
It is important to repeat that these are average measurements. Although Emmy is 2 years old, her waist measurement is only 19.5 inches - not 21. So it's a good idea to measure if you want to be certain about your fit, although this should be a good jumping off point.
When I go in to serge, this is how I begin. I place the beginning of the fabric edge well under the presser foot, just below the knife. Sidenote - if your knife is down when you're going to start a seam, turn the hand wheel until the knife is up:
For this skirt, I poopoo'd seam allowances, and just let the knife take off what it needed to to make the seams clean and even:
Ok, to start (finally lol), serge your waistband together along the two short sides, opposite the folded side:
Snip off your thread tail:
Admire your perfectly flat seam that you knew you would achieve because you figured out your differential feed setting beforehand:
Fold your waistband in half, so that the raw edges are chillin' together:
Serge both skirt pieces as you did the waistband, serging opposite the folded edge, and you will have three tubes of awesome:
Turn your Inner Skirt inside out:
Insert your Outer Skirt into your Inner Skirt like so, matching up the bottom edges and pinning at the seam line:
I don't usually like to use pins when serging because I'm horrified that I might run over one with the knife :O, but in this case, to keep everything together, it's a good idea to pin. So pin around your bottom edge:
On my serger, and most others I presume, you can remove this part of the work bed. I like to do this, especially when serging small garments like this one:
So now get ready to serge your bottom seam by placing it under the presser foot. I like to start near my back seam:
Serge all the way around (SWEET LORD REMOVE THE PINS BEFORE THEY ARE ANYWHERE NEAR THE PRESSER FOOT GAHH!), not stretching or pulling - just allowing the feed dogs to do their magic, until you approach where you began:
Now in order to keep from going in circles here, you're going to want to gradually move your garment forward and out to the left. I am way overdoing it in the photo below, fyi. Just keep the all-of-it moving forward, as you guide the fabric out to the left, and don't worry about serging over what you've already serged, that's ok:
Trim your thread tails and admire your handiwork:
Now pull down the Inner Skirt:
Niiiiiiice.
Next, pull the Inner Skirt up into the Outer Skirt until the top raw edges are lined up together:
Here's a peak into the bottom hem you just made - without hemming:
Awesome :)
Now, pin all the way around the top to prepare for basting a gathering stitch:
We need to gather the skirt to fit into the waistband:
On your sewing machine, pull out a nice long bit of thread:
Lower your thread tension, so it's easy to pull your gathering stitch:
Set your stitch length to mad long:
And stitch around the top of the skirt without backstitching:
Don't backstitch at the end either. Instead leave yourself another long tail and tie it into a double knot. Now hold onto the long bobbin thread you started with and begin gathering your fabric evenly around the skirt. Pull gently - this is just a bit trickier (I find) on knits than it is on wovens.
Gather until your skirt is looking like it'll fit into your waistband and tie off those threads when your satisfied with the gathering:
Now pin your waistband around the gathered skirt, matching your raw edges and back seam:
Here's where that detachable part of the work bed is a good thing. Everything moves smoothly around the smaller opening:
Since at this point we're serging 4 layers of fabric, the seam may be a thick one, resulting in a traffic jam behind the presser foot:
The solution to this is to, after every inch or so of serging, stop and gently pull your skirt through the space towards you, as pictured below. If you allow it to bunch up, the feed dogs won't be able to feed the fabric and you will have WHOLE LOTS of thread on one small area of fabric that didn't move anywhere while you had your pedal to the metal. I know this to be true.
You are all but DONE!
Inspect the waist seam to make sure you've caught all four layers of fabric. If not - no worries! Go serge over it! But hopefully you you did, and you can now flip up your waistband and swoon over your new little skirt!
SWOON!!
:D
So there you have it! A super quick and adorable bubble skirt for your little one! What do you think? Will you give it a try?! Are you less wary of sergers now?
If you have any questions, please don't hesitate to comment or email me. I'd be happy to help!And send me pics after you make one!
ALSO - stay tuned for quick tute on how to make this a twisted-hem bubble skirt!Fuuuuuuuuuuuuuun. :D
Aaaand, here it is!
Much love, 


