Recent Posts

Showing posts with label Crafting. Show all posts

1.07.2013

DIY Flower Crown - Tutorial


I want to say first - in case you're like me and prefer not to use glue if possible, and cringe at the prospect of hand-sewing - that this crown is made entirely on your sewing machine.

NO GLUING.  NO HAND-SEWING.
HOORAY!


Emmy has a favorite book called Do Princesses Wear Hiking Boots?, and it sits firmly at the number two spot in our nightly rotation.  It's such a cute book.  The little girl in the story wears this crown of flowers wherever she goes, whatever she's doing - even if she's playing in the rain and mud.  So I decided to make Emmy a crown, too!  To wear while she's licking furniture or pretending not to eat the dog kibble.  Haha, that's my princess.  ;)

My goal with this project was total durability.  I want her to be able to REALLY wear it all the time, if she so chooses! So it also had to be totally comfortable.  I thought about using glue, but I don't like how it gets so hard and lumpy.  Plus, I'm not the tidiest gluer.  Plus my friend Beth has my glue gun right now #bethonblast.  So that was out.

Then when I was fiddling around with store-bought headbands Emmy has, it dawned on me - sandwich the flowers in between two headbands.  Then, an even better idea - make the whole shebang from scratch!

Want to make one, too!?

Emmy-Approved!

You will need:

                                   - 36 inches of Fold-Over Elastic (FOE) (more info below)
                                   - Faux Flowers (specifics below)
                                   - Sewing Machine
                                   - Thread to Match your FOE


A critical detail your flowers need to possess:

They need to taper out at the bottom of the stem.  Most faux flowers that are on a vine like this will have that wider end - it's the part that sort of 'plugs' into the vine.  Know what I mean?

This is crucial for your flowers to stay put within your crown.


First step:  Have your helper pull off a bunch of flower sprigs, while you're readying your FOE!  


A few things about fold-over elastic:
It's awesome.
It's soft as all get-out.
It comes in a bazillion colors and patterns.
It's incredibly easy to work with.
There are tons of applications for it's use.

A few cool FOE projects:

A Few Places to Buy FOE:


So here is my 36ish inches of FOE - note it's folded in half.  You can also use two 18ish inch pieces if that's what you have.  Emmy has a pretty sizable melon, so in my opinion this measurement would fit ages 2 probably up to 5.  For the little'ns (2 and younger) I would cut it maybe an inch smaller.  
Or just wrap the FOE around the intendeds' head to get an estimate of length - and remember, this stuff stretches well, even after we sew it!


Line up several sprigs along the FOE to get a sense of how many you're going to need:

I ended up needing one more sprig than I initially laid out here.

Pin the ends of your FOE together, overlapping all 4 layers:


Zigzag stitch over your pin (we're livin' on the edge!), making sure to catch all layers:


Now you've essentially made a double-decker headband:


Now we're going to make the first little slit for our first sprig.
Near the seam you just sewed, pinch one layer (the outer layer) of the FOE like so:


Snip a very tiny hole in the center of the FOE - there's a groove running down the middle of fold-over elastic - that's where your going to snip.  And remember, this stuff stretches, so the hole needn't be as big as your stem:

Tiny snip!

Insert your first sprig into the hole you snipped, all the way until you reach a fork (or whatever other geographical feature your particular flowers have):


Now we're going to zigzag stitch over the part of the stem that's in between the two layers of FOE:


The key here is to lock in that wider part of the stem.  Where it's wider, use a wider stitch, and as the stem narrows, make your stitches more narrow.  This will ensure that the stem can't be pulled out:

My stitch widths varied from about 2.5 to 6mm at the widest point.

Tack down the stem at various spots, with various stitch widths, and also right up against the opening itself:


Now, lay your next sprig on top of the headband, in line with the first.  Do you want the flowers more compact?  More spread out?  Up to you!  Mark with a pin or with your keen eye where your next snip needs to be, and snip:


Try to keep the previous flowers out of the way when you're sewing the next ones in line:


Continue all the way around, until you are back to whence you started!  I had seven sprigs in total, but this will depend entirely on your flowers and your spacing.  Also, any bunchiness or weirdness will straighten out beautifully once on the wearer.


Done!  Put atop beautiful babychild:


I hope you've enjoyed this tutorial!  Hit me up if you make one!

I truly can't WAIT to see the variations you make!


Have a great week everyone,

cheers!


Pin It

12.11.2012

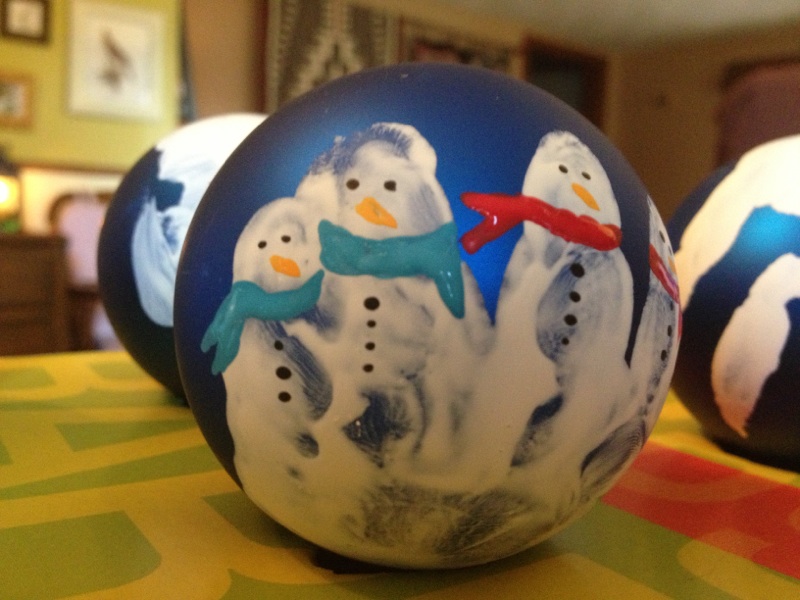
Snowman Hand-print Ornamenahahahaaaa!


Good Tuesday to you all!

I have been away from this blog'o'mine for quite a bit, eh?!  I am starting to feel the itch again, and I hope to be back here much more often now.  Mojo's rising.  :)

SO!  Check these babies out: 


Ha!  Do you love them as much as I do?!?!

I saw this adorable tutorial on the Pinterest's a few weeks ago, and thought it would be awesome to do with Emmy - quick, fun, and I already had everything on hand to make them.


So silly cute, hers are!

HOWEVER.
We made six and only one ended up being usable as anything close to resembling Snowmen!  Emmy was alllll about schmearing the paint all over the ornaments but it was just so funny and cute, I didn't put up too much of an argument.  She's not even three after all.  ;)

If I do these again, which I think I will - I really love them! - I will do it a little differently.  In the tutorial, the pictures show the ornament sitting the palm of the child's hand, and then they close their hand up around the ornament... I think next time I will hold the ornament upside down and like, roll Emmy's hand over top of it.  That make any sense?

Some of the others... 


Disembodied Snowmen!


Melting Snowmen!


SAW SUPER CUTE TODDLER-PARENT CRAFT ON PINTEREST:


NAILED IT:

Lolz.
Have a good day!
Pin It
Please Pin responsibly. If you like something you see here that isn't original to 
EmmylouBeeDoo.blogspot.com, please click through to the original Author's post. Thank you!

3.12.2012

Make a Quick and Easy St. Patrick's Top - Blast from the Past


Hiyo!

Since St. Patrick's Day is coming up this weekend (yay!), I thought I'd re-post about my tutorial for the Lucky in Love Onesie!


It's a super easy and super fun project.  The kids can even help with the painting part (if you dare)!  Here's a sweet baby Emmy modeling hers last year:


This doll turns TWO next week!  :O


And here are a couple adorable tee shirt versions by Steph @ Crafting in the Rain:


CUTE!

So if you want to whip one up, check out the tutorial HERE!
Send me pictures if you make one & I'll show them off next week!


Cheers, me lassies!


Pin It

10.07.2011

Meet Ellen! & a Halloween Powwow


Happy Friday!  Woot!
 
May I please introduce you to my new lady friend, Ellen:

Isn't she a dear?!  I found her on Craigslist!  And I named her after the adorable lady with whom she lived previously.  She isn't quite as endowed in the northern region as I am, so she's wearing a stuffed bra.  Which is so, so weird.  I'll get over it. :)

And she's modeling a new shirt that's going to be featured as a guest post project on another blog!  Stay tuned for that!


So now, down to business.  Halloween!
I want to whip up something for Emmy, but I am seriously running out of time!  Yall want to help me pick what to make?  Check out these costume ideas that I'm loving:


Mermaid costume!  Unfortunately, It's def going to be too cold for this unless I make it long-sleeved.  Meh... Maybe.  It's so cute though!
Source: etsy.com via Kathleen on Pinterest


That shell!  I love it so much.

Now this next one is the MAJOR front runner!
Little sheep!!!
Source: parents.com via Alissa on Pinterest


Could you just keel over from the cute?!!  Plus this little munchkin looks about Emmys size, so I know it would be comparably adorable.  I think I would just purchase the black tee, already have black leggings, and use this pattern (below) that I already have to make the sheep body, sans sleeves and pocket!:


Seriously, so cute.  And how fun would it be to fill a cart at Michael's with bags of big ol' pompoms?  Answer - wicked fun.  :D

Candy Corn costume!!!  This one is just so sweet, and I know for sure that it would whip up in like, one evening.  One evening plus wine.  Now that's an easy project.


I love the matching hat and bag!  I think I could make a long sleeved version with my go-to dress pattern, the Charlotte Dress from Mama Stellato.  Totally doable!  I'd have to source out orange tights though...  Hm.


Owl costume!!  This one is as insanely cute, but I do not harbor the required patience it would take to make it.  Not this year anyway, I'm already running late!

CUTE!


So what do you guys think?!  Do you love the sheep one as much as I do??
Are you making any costumes this year?


Holler attcha boo!


9.19.2011

Copy That


Good Monday all!  :)
 
So, yall are on Pinterest, right?  What an epic black hole of time sucking wonderment, eh?  I love it.  So. Much. Inspiration!  But with all the drooling that goes on there, I have to remind myself, often, that Pinterest is full of other peoples ideas.  If I want let my creative ideas out of my head, I need to close the damn laptop, ya know?  Seriously, how many times have you said out loud while on Pinterest, "why didn't IIIIIIII think of that?!?".  Right??!  Oye. 
 
Anyway, that said, there are still massive amounts of clever ideas that I want to recreate.  I saw these onesies a few weeks ago and I fell in LURVE!  My step-bro and his beautiful wife are expecting twin boys (!!!) so these were so perfect.  Behold!

Ha! :D

Aren't they great?  Here is the original inspiration, along with very handsome models:


 Those cheeks!  :D
 
To make these, I used the same freezer paper stenciling method as my Lucky in Love Onesie tutorial found HERE, or up there under the Tutorials tab.  Super duper easy.


Well played, Pinterest.  Well played.
 
Hey!  If anyone needs an invite to join Pinterest, leave your email in the comments, and I'll send you one.  We can waste several hours together! :D
 
 
Have a good day!


LinkWithin

Related Posts Plugin for WordPress, Blogger...